
Overview
This protocol explains the heat adaptation system used across ESP × miki coaching.
The aim is to build controlled, repeatable heat exposure that supports performance in hot conditions, durability under thermal stress, and long-term athlete health.
Heat adaptation is not only about surviving hot races. It develops physiological adaptations, performance confidence, and mental control so athletes can perform under heat stress.
Heat exposure can also provide a secondary cardiovascular stimulus. It may offer some overlapping benefits with altitude training through plasma volume expansion and improved cardiovascular efficiency, although the mechanisms are different.
This is not just about handling heat — it is about performing under it.
Who This Guide Is For
This is an athlete-facing protocol supported by coaches, parents and team staff where relevant.
It is for riders preparing for hot weather training, racing, travel, camps, or repeated exposure to warm environments. It is not a medical protocol and should not be used to force heat exposure through illness, dehydration, poor recovery or unsafe symptoms.
- Athletes should understand the simple sequence and safety rules.
- Coaches should individualise timing, method, dose and recovery based on the athlete and training context.
- Junior riders and heat-sensitive athletes require conservative progression and closer support.
Protocol Guidance
The values shown throughout this protocol — including temperature ranges, exposure duration, heart rate response, and recovery indicators — are guiding ranges, not strict prescriptions.
Individual response varies depending on training history, body size, sweat rate, hydration habits, environmental exposure, hormonal status, fatigue, and overall training load.
The purpose of this protocol is to provide a clear starting framework that coaches and athletes can apply consistently, monitor, and refine over time.
Heat exposure should be built progressively. The goal is repeatable adaptation, not maximal suffering.
Where temperature ranges are shown, they are thermal-load guidance zones, not targets to chase. Control, symptoms, heart rate response, RPE, sweating, and recovery always come first.
Heat Adaptation Basics
Heat adaptation is the process of using repeated, controlled heat exposure to improve tolerance, thermal stability and performance in hot conditions.
The best heat plan is the one that creates enough thermal stimulus without compromising health, recovery, hydration, or the quality of key training sessions.
- Passive heat uses sauna, hot water immersion, bath or spa exposure after or separate from training.
- Active heat uses riding in hot conditions or indoor heat and carries higher training and safety cost.
- Most athletes should build with passive heat first, then use active heat selectively when race-specific feel is needed.
- Heat adaptation should be planned around training quality, not simply added on top of fatigue.
Heat Adaptation Rules
- Build heat exposure progressively.
- Use sauna as the preferred passive method where available.
- Use HWI / bath / spa when sauna is not available.
- Use on-bike heat selectively for race-specific feel and performance adaptation.
- Protect key training sessions — do not stack heat on hard days unless planned.
- Hydrate to adapt — dehydration limits the benefit.
- Controlled discomfort is expected. Loss of control is not.
- Individual response leads the final dose.
How to Use This Guide
Use this guide in order. The early sections are practical and tell you what to do. The later sections explain the science, testing, and deeper detail.
The phases explain when and why to use heat. The protocol options explain how to apply each method.
Do not try to combine every method. Coaches may choose sauna, hot water immersion, or on-bike heat depending on the athlete, phase, race demands, access, and recovery status.
How to Use This Guide Table
| Step | What to do | Why |
|---|---|---|
| 1 | Identify the phase | Determines the purpose and dose of heat exposure |
| 2 | Choose the method | Sauna, HWI, or on-bike depending on access, specificity, and risk |
| 3 | Follow the exact protocol | Keeps each method clear and repeatable |
| 4 | Apply before / during / after safeguards | Protects athlete health and training quality |
| 5 | Rehydrate and refuel | Locks in adaptation and supports recovery |
| 6 | Check readiness before the next exposure | Ensures you are okay to proceed |
| 7 | Use altitude guidance if relevant | Avoids stacking major stressors |
Heat Adaptation Quick Start
Use this quick start when you need the practical application first.
The basic sequence: purpose, method, dose, safeguards, monitoring and recovery.
The full protocol explains each method, safety rule, monitoring tool, altitude consideration and science detail later in the guide.
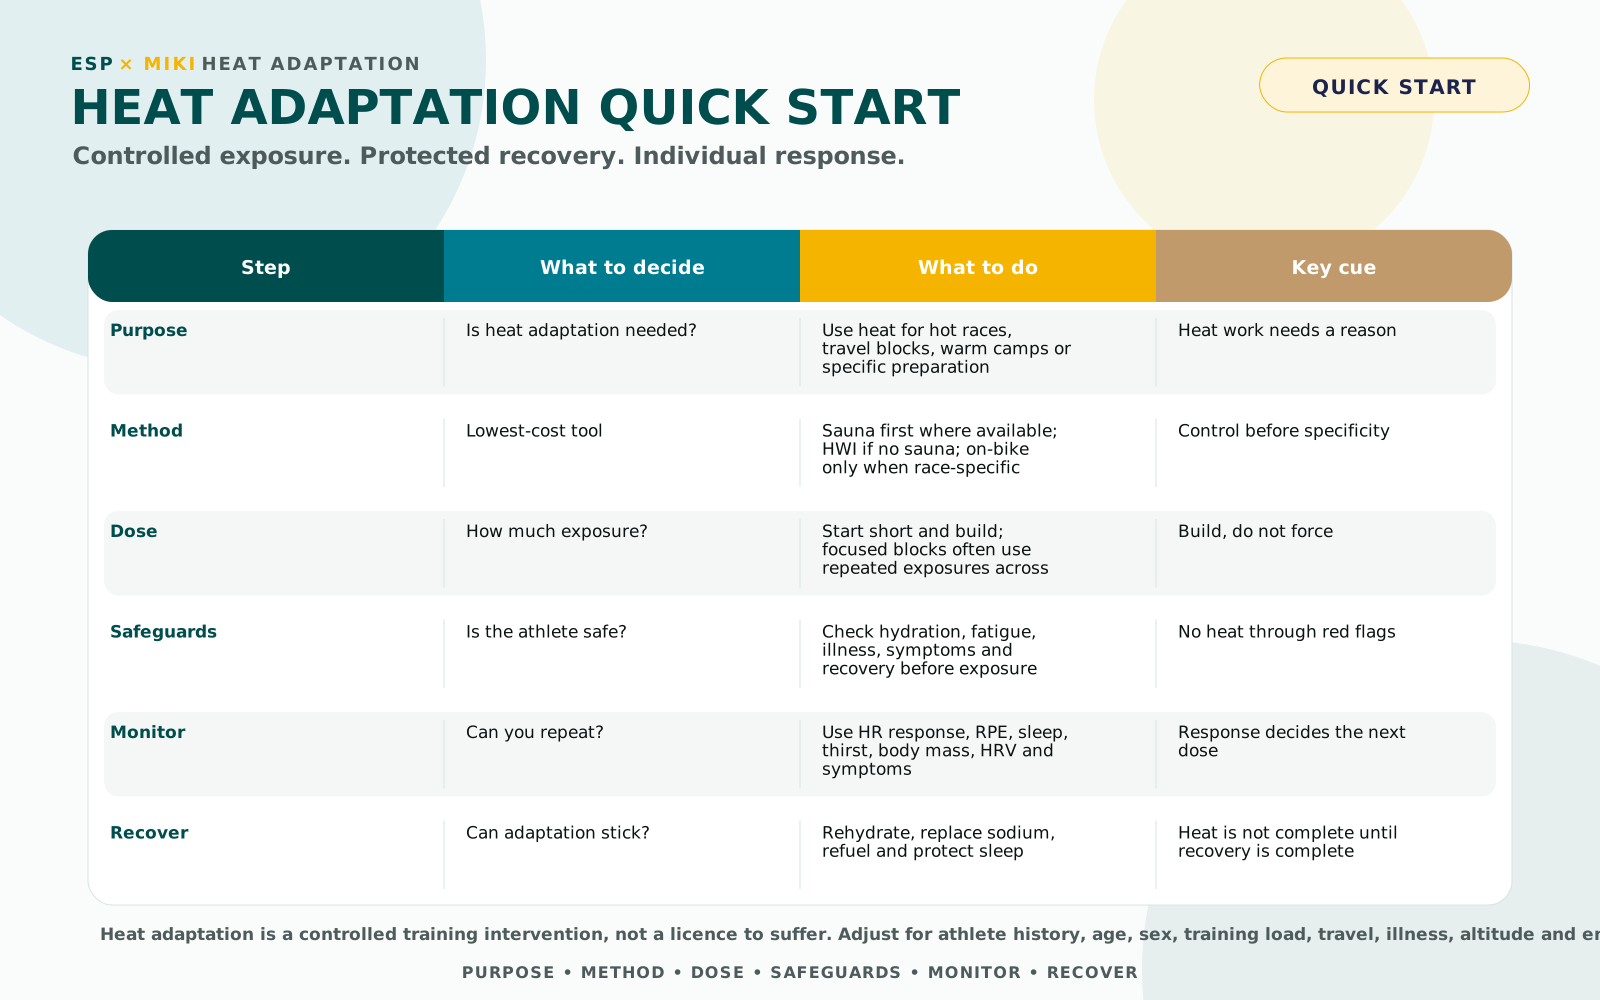
Quick Start Heat Table
| Situation | Best method | Typical dose | Key cue |
|---|---|---|---|
| Preparation / Initial Exposure | Sauna preferred; HWI if needed | 1–3×/week, short exposure | Build familiarity, not fatigue |
| Adaptation Phase | Sauna preferred; HWI alternative | ~10 exposures across 10–15 days | Do not force heat on hard days |
| No sauna access | HWI / bath / spa | Start 15–20 min; build toward 30–40 min | Maintain water temperature |
| Race-specific heat preparation | On-bike heat | Final 30–60 min of selected Z2 rides | Watch HR drift and stay controlled |
| Maintenance | Sauna / HWI / short active heat | 2–3×/week | Touch the stimulus, don’t chase it |
| Re-acclimatisation | Passive first | 3–5 day reintroduction | Rebuild gradually |
| Altitude integration | Very cautious passive only, if used | Short exposure only | Avoid stacking major stressors |
| Thermal load guidance | CORE sensor or consistent thermometer routine | Typically ~38.3–38.9°C depending on phase | Use as guidance, not a target to chase |
Minimum Recovery Rule
After heat exposure, weigh before and after where practical.
1 kg body mass loss ≈ 1 L fluid loss.
Replace 125–150% of fluid lost over the next 2–4 hours, including electrolytes.
The heat session is not complete until rehydration is complete.
Visual Quick Start
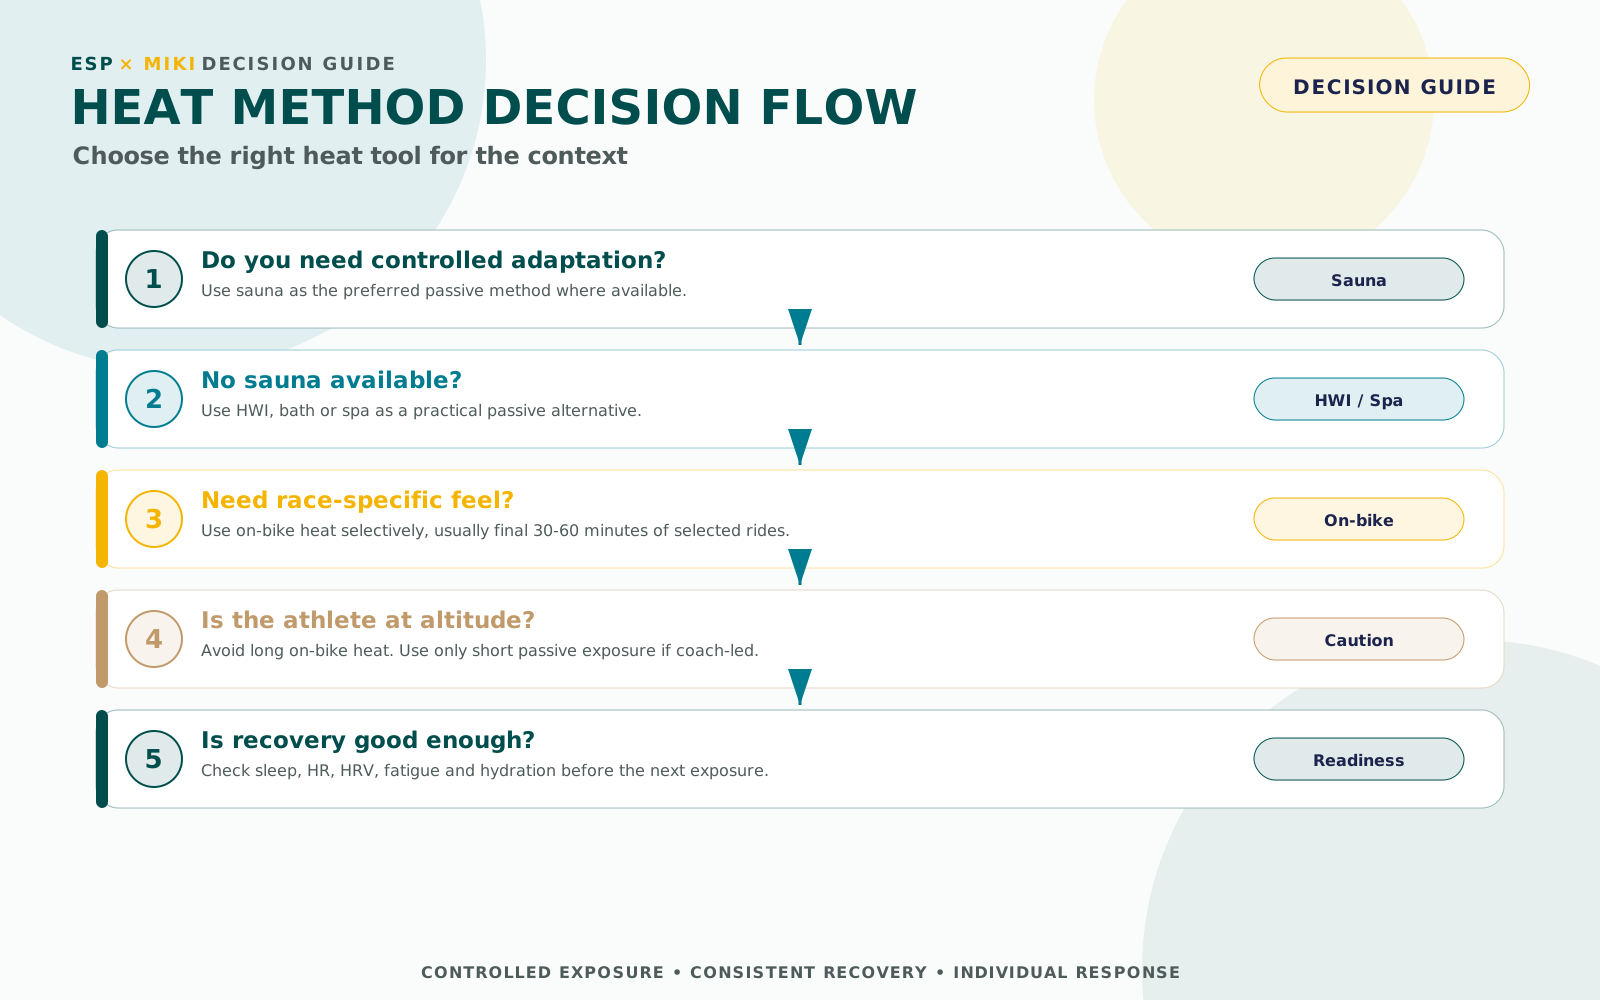
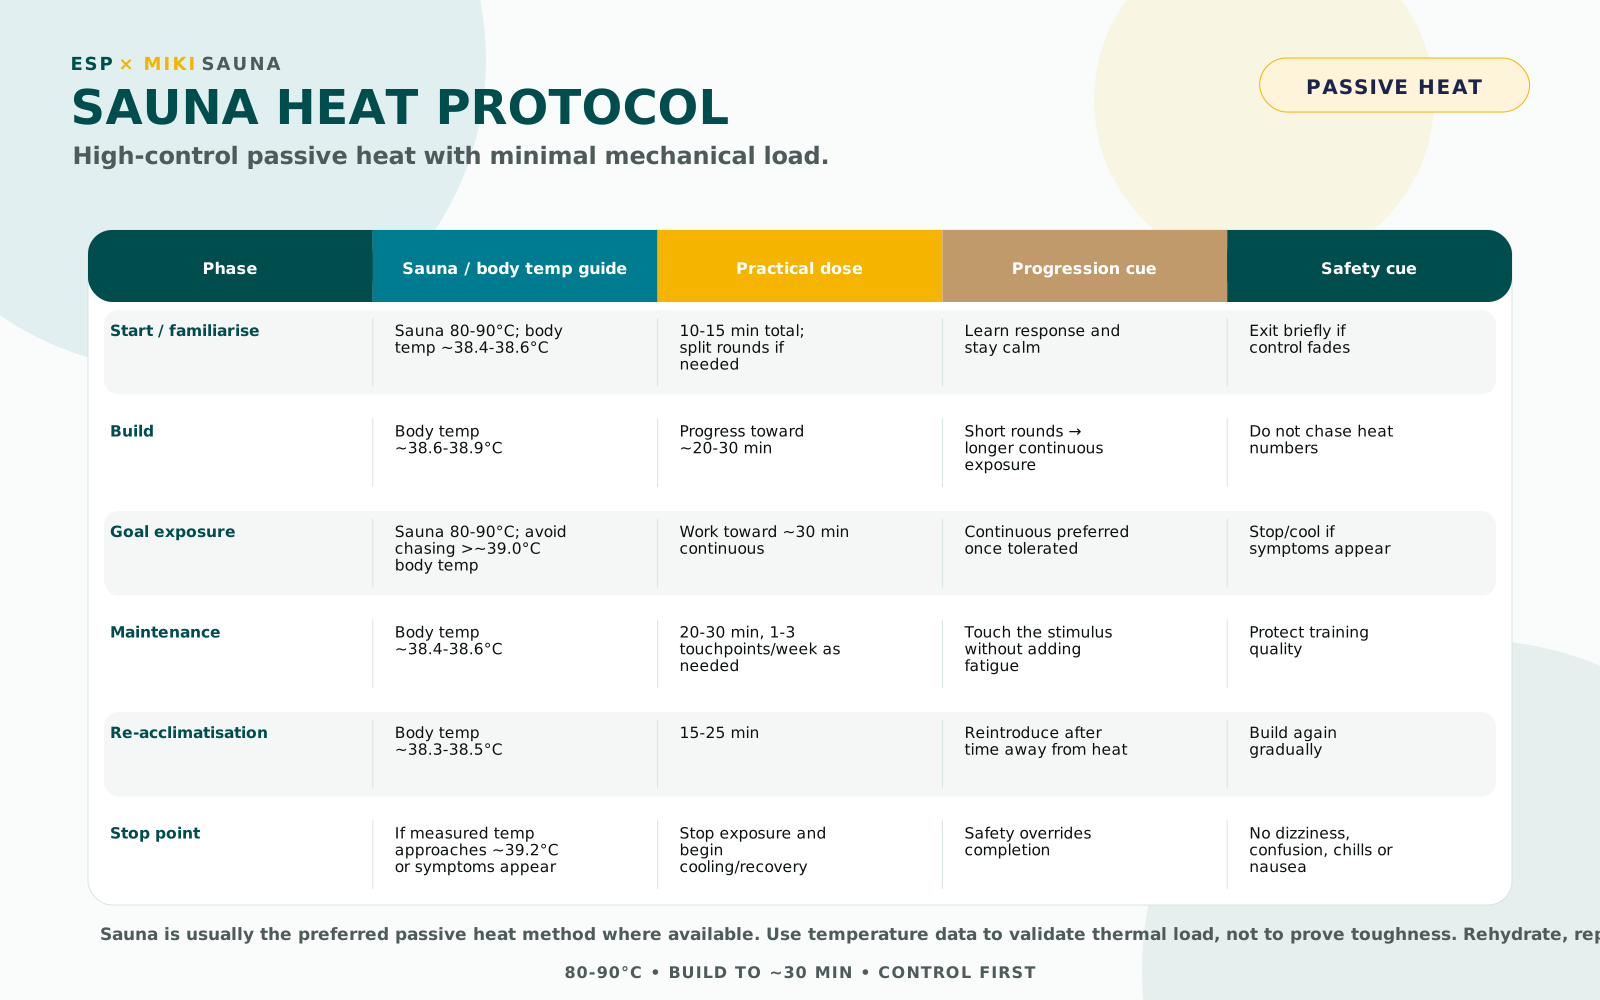
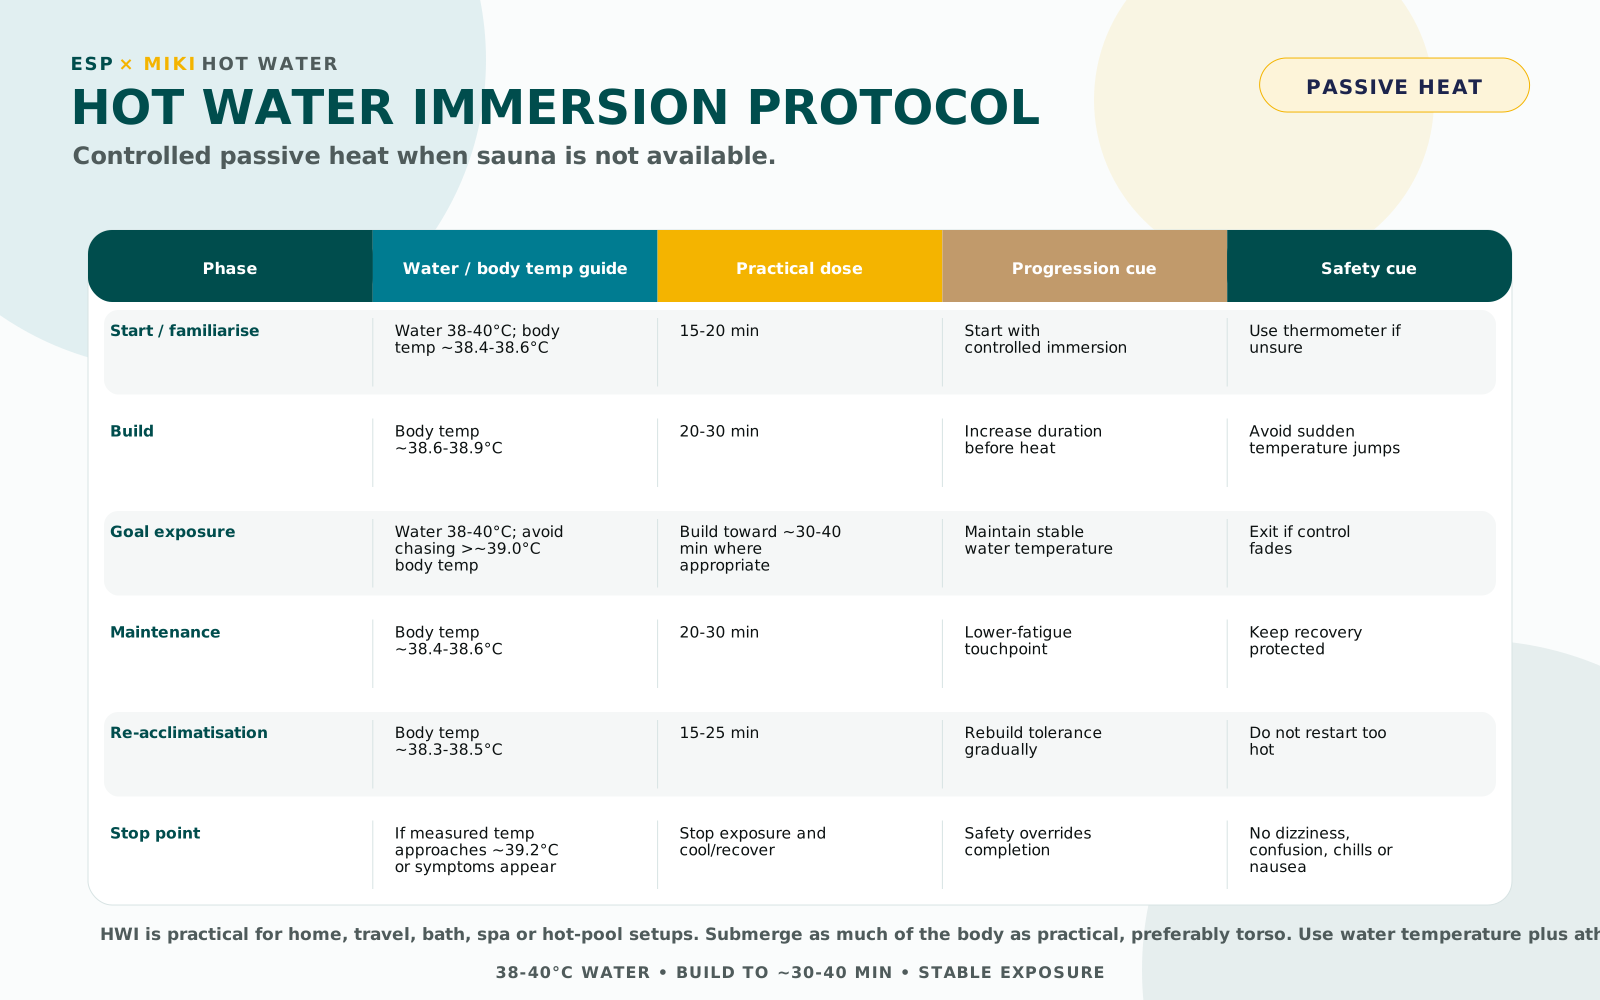
Use these visuals as the field guide: understand the heat sequence, choose the method, then see the practical sauna, hot water immersion, or on-bike protocol before setting the timeline.
Visuals are quick guides. Use the detailed sections to individualise for athlete status, training load, environment, travel, altitude, hydration, recovery and safety.
Step 1: Decide If Heat Adaptation Is Needed
| Situation | Heat adaptation value | Practical decision |
|---|---|---|
| Hot race or travel block | High | Build a planned heat block before travel or racing. |
| Warm conditions but stable training | Moderate | Use short passive exposure or maintenance if recovery is good. |
| No heat demand | Low | Do not add heat stress unless there is a clear purpose. |
| Poor recovery, illness, dehydration or high fatigue | Unsafe / low value | Delay heat exposure and restore the athlete first. |
| Altitude camp or heavy training block | Caution | Avoid stacking major stressors; use only coach-led short passive exposure if justified. |
Step 2: Choose the Heat Method
Choose the heat method based on the purpose of the phase, available equipment, training load, and athlete response.
Heat adaptation can be achieved through three primary methods:
- Passive Heat — Sauna
- Passive Heat — Hot Water Immersion (Bath / Spa)
- Active Heat — On-Bike
Each method should be kept clear and used for its own purpose. Coaches may combine methods across a block, but athletes should not mix protocols within a session unless instructed.
For most athletes, sauna is the preferred passive method where available. HWI is a practical alternative when sauna is not available. On-bike heat is used more selectively for race-specific feel and performance adaptation.
Typical Method Use by Phase
| Phase | Preferred Method | Optional Add-On | Why |
|---|---|---|---|
| Preparation / Initial Exposure | Sauna or HWI | None or very light on-bike | Build familiarity without disrupting training |
| Adaptation Phase | Sauna as primary; HWI if sauna unavailable | Selective on-bike heat | Control adaptation first, then add specificity |
| Maintenance | Sauna or HWI | Short on-bike if appropriate | Maintain benefits with low fatigue |
| Re-acclimatisation | Passive first | Short on-bike if racing demands it | Rebuild tolerance efficiently |
Step 2A: Sauna Protocol
Sauna is the preferred passive heat method where available.
It provides efficient, repeatable heat exposure with minimal mechanical load and integrates well across preparation, adaptation, maintenance, and health-focused phases.
When to Use Sauna
- Primary passive heat method for most athletes.
- Useful across preparation, adaptation phase, maintenance, and re-acclimatisation phases.
- Good option when training quality must be preserved.
- Useful year-round at lower frequency for athlete health, relaxation, and routine.
Sauna Protocol
| Component | Guidance |
|---|---|
| Temperature | 80–90°C ideal range |
| Goal duration | Work toward ~30 min continuous exposure |
| Starting point | 10–15 min total exposure |
| Progression | Gradually build toward 30 min continuous |
| Structure | Continuous preferred; split into 2–3 rounds if needed |
| Breaks | Short breaks to refresh, not fully cool down |
| Timing | Often post-training or on lower-load days |
Progression
- Build total exposure gradually — do not jump straight to 30 min.
- If continuous exposure is not tolerable, use short intervals and reduce breaks over time.
- Aim to progress from intervals → longer continuous exposure.
- Avoid pushing through loss of control just to complete time.
Thermal Load Guidance
These ranges are guidance zones for athletes using a CORE sensor or consistent thermometer routine. They are not targets to chase.
- Use temperature data to confirm sufficient thermal load, not to chase maximum heat.
- If heart rate, RPE, breathing, symptoms, or recovery markers suggest excessive strain, reduce exposure even if temperature is below the guide range.
- If measured temperature approaches ~39.2°C, stop exposure and begin cooling / recovery.
| Phase | Ideal measured range | Practical dose | Notes |
|---|---|---|---|
| Preparation / Initial Exposure | ~38.4–38.6°C | 10–20 min building gradually | Familiarisation and controlled tolerance |
| Adaptation Phase | ~38.6–38.9°C | Build toward ~30 min continuous | Main adaptation stimulus where recovery remains stable |
| Maintenance | ~38.4–38.6°C | 20–30 min | Touch the stimulus without excessive fatigue |
| Re-acclimatisation | ~38.3–38.5°C | 15–25 min | Short reintroduction after time away from heat |
| Safety caution | Avoid chasing >~39.0°C | Stop / cool if symptoms or loss of control appear | Use numbers to validate, not to prove toughness |
Breathing & Control
Sauna is an ideal environment to practise breathing control under stress.
Heat exposure increases breathing demand and perceived effort. Use the session to practise staying calm as stress rises.
- Start with nasal breathing where possible.
- Do not force nasal breathing if it creates tension or distress.
- Use controlled breathing such as 5 in / 7 hold / 9 out, or a similar ratio.
- Box breathing such as 4–4–4–4 or 5–5–5–5 may also be used.
- Focus on slowing breathing, extending the exhale, and staying relaxed.
Hydration & Recovery Integration
- Small amounts of electrolyte fluid can be consumed during exposure.
- Use regular sips rather than large volumes.
- Avoid excessive dehydration — aim to stay within ~2–3% body mass loss.
- Recovery nutrition should not be significantly delayed.
- Hard sessions → begin fueling before sauna.
- Easier sessions → fueling can follow sauna.
Sauna Safeguards
- Heat intensity is higher than HWI and exposure builds quickly.
- Exit briefly if needed; this is not failure.
- Stop for dizziness, nausea, chills, confusion, or loss of control.
- Avoid sauna when unwell, excessively fatigued, or poorly hydrated.
- Be cautious when training load, poor sleep, or altitude exposure are already high.
Step 2B: Hot Water Immersion Protocol
Hot Water Immersion (HWI) is a practical passive heat option when sauna is not available.
Baths, spas, or hot pools can all be used if temperature is controlled appropriately.
When to Use HWI
- When sauna access is not available.
- When a home, travel, bath, spa, or hot pool setup is more practical.
- When controlled passive heat is needed with minimal additional mechanical stress.
- Useful for preparation, adaptation phase, maintenance, and re-acclimatisation phases.
HWI Protocol
| Component | Guidance |
|---|---|
| Water temperature | 38–40°C |
| Starting point | 15–20 min |
| Goal duration | Build toward ~30–40 min where appropriate |
| Timing | Usually post-training |
| Immersion | Submerge as much of the body as practical; torso preferred |
| Setup | Bath, spa, or hot pool |
Progression
- Start with 15–20 min and build gradually.
- Increase duration before increasing heat load.
- Avoid large jumps in temperature or time.
- Use HWI as controlled stress, not a toughness test.
Thermal Load Guidance
These ranges are guidance zones for athletes using a CORE sensor or consistent thermometer routine. HWI temperature can be controlled, but internal response still varies between athletes.
- Use water temperature plus internal response; both matter.
- Medical-grade thermometer readings are best used as repeatable trends rather than exact core temperature.
- If measured temperature approaches ~39.2°C, stop exposure and begin cooling / recovery.
| Phase | Ideal measured range | Practical dose | Notes |
|---|---|---|---|
| Preparation / Initial Exposure | ~38.4–38.6°C | 15–25 min | Controlled introduction |
| Adaptation Phase | ~38.6–38.9°C | 30–40 min | Main passive adaptation option when sauna is not available |
| Maintenance | ~38.4–38.6°C | 20–30 min | Lower-fatigue maintenance exposure |
| Re-acclimatisation | ~38.3–38.5°C | 15–25 min | Rebuild tolerance gradually |
| Safety caution | Avoid chasing >~39.0°C | Stop / cool if symptoms or loss of control appear | Water that is too hot increases risk without improving adaptation |
Practical Tips
- Use a thermometer to check water temperature if unsure.
- In colder climates, water temperature can drop during the session.
- Add hot water gradually if required to maintain temperature.
- Avoid large or sudden increases in temperature.
- Prepare fluids in advance to avoid unnecessary exits.
- Spa pools and hot baths are both acceptable if temperature is within range.
Hydration & Recovery Integration
- Small amounts of electrolyte fluid can be consumed during immersion.
- Use regular sips rather than large volumes.
- Avoid excessive dehydration — aim to stay within ~2–3% body mass loss.
- Recovery nutrition should not be significantly delayed.
- Hard sessions → begin fueling before HWI.
- Easier sessions → fueling can follow HWI.
HWI Safeguards
- Water that is too hot increases risk without improving adaptation.
- Exit if dizziness, nausea, chills, confusion, or loss of control occurs.
- Avoid when unwell, excessively fatigued, or poorly hydrated.
- Be cautious when combining with high training load or poor sleep.
Step 2C: On-Bike Heat Protocol
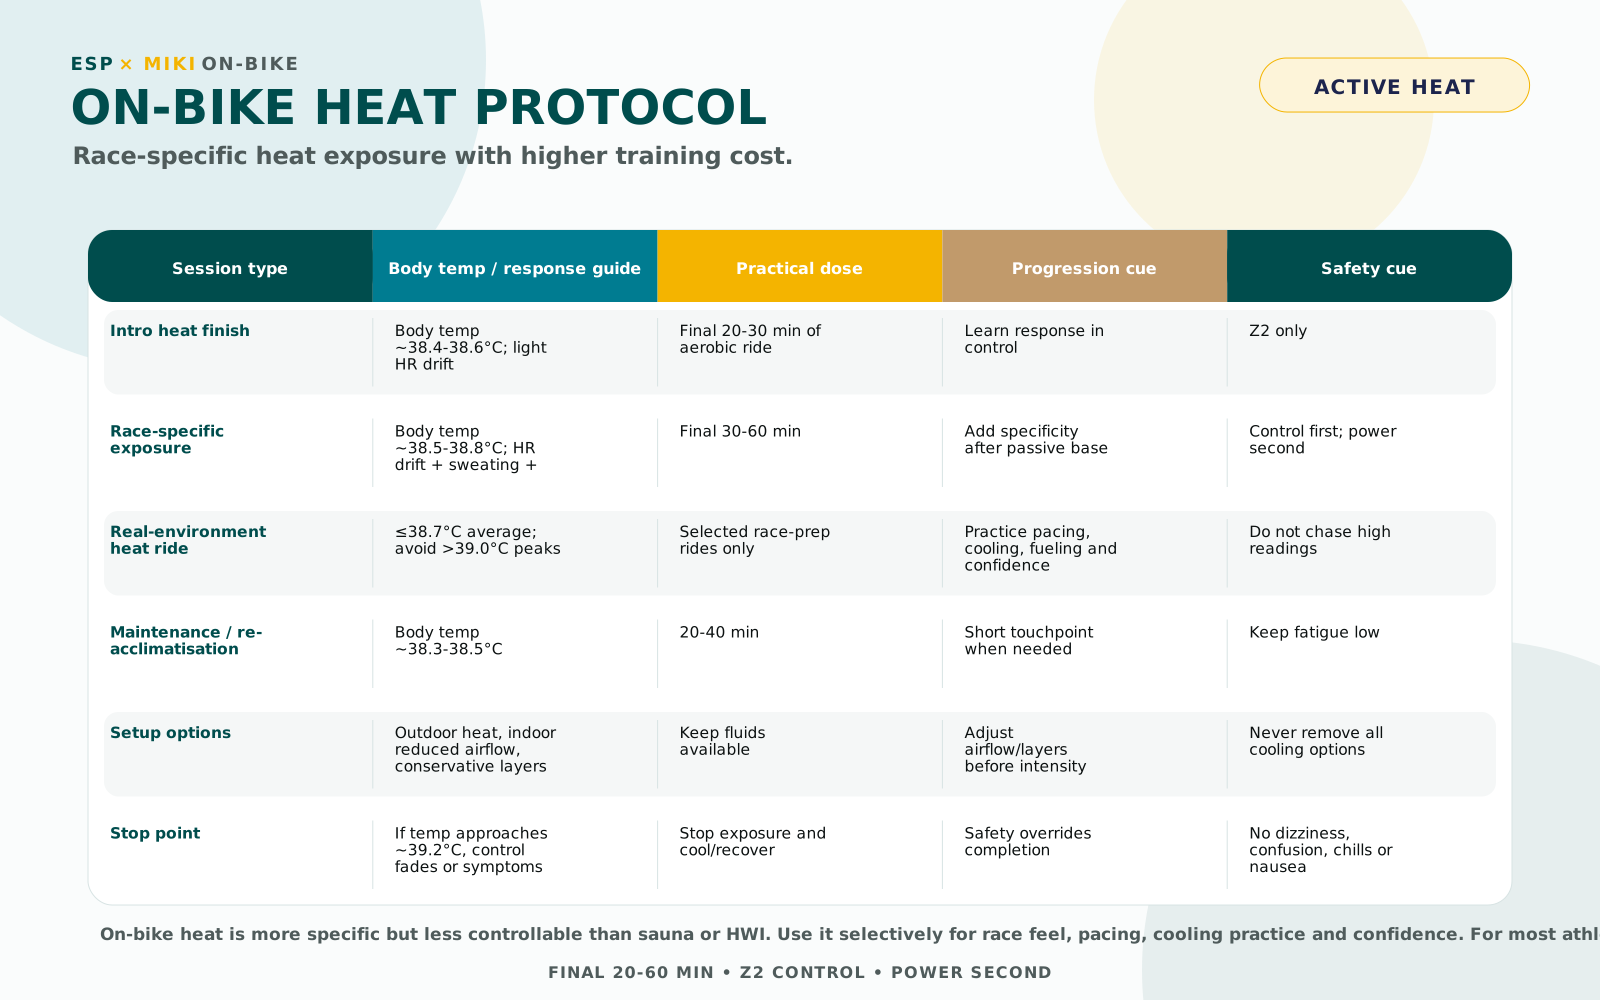
On-bike heat is used for race-specific adaptation and performance feel. It is more difficult to control than passive heat and therefore carries higher risk.
For most athletes, passive methods remain the foundation. On-bike heat is introduced selectively, usually during race preparation, to help athletes understand how heat changes effort, heart rate, sweating, pacing, cooling, and fueling.
When to Use On-Bike Heat
- During the Adaptation Phase or race preparation phases when specificity is needed.
- When preparing for a hot race or expected hot conditions.
- When the goal is confidence, perception, cooling practice, and race feel.
- Usually not required during early preparation / initial exposure or high-fatigue weeks.
On-Bike Protocol
| Component | Guidance |
|---|---|
| Placement | Usually final 30–60 min of a ride |
| Intensity | Z2 / aerobic endurance |
| Maximum heat exposure | Generally cap at ~60 min for most athletes |
| Progression | Start with shorter exposure or lower heat load |
| Environment | Outdoor heat, indoor low airflow, or additional layers if needed |
| Priority | Control first; power second |
Key Questions During the Session
- Can I keep power in Z2 without forcing it?
- Is heart rate rising progressively at the same effort?
- Am I sweating clearly and consistently?
- Is perceived effort rising while I remain in control?
- Am I maintaining control, or starting to fight the session?
Indicators of Sufficient Heat Stress
- Progressive HR drift at constant power.
- A noticeable HR rise, often ~5–10+ bpm at the same effort.
- Increased and sustained sweating.
- Rising RPE at the same workload.
- Feeling worked by the heat, but still controlled.
Thermal Load Guidance
On-bike heat is harder to control, so temperature ranges should be used more cautiously than in passive heat. HR drift, RPE, sweating, and control remain the primary guides.
- Do not chase 38.9–39.0°C on-bike unless coach-led and well monitored.
- For most athlete-led sessions, stay below ~60 min of heat exposure and prioritise control.
- If measured temperature approaches ~39.2°C, stop exposure and begin cooling / recovery.
| Session type | Ideal measured range | Practical dose | Notes |
|---|---|---|---|
| Short heat finish | ~38.4–38.6°C | Final 20–30 min | Good introductory, maintenance, or lower-risk option |
| Race-specific heat exposure | ~38.5–38.8°C | Final 30–60 min | Z2 only; monitor HR drift and control |
| Re-acclimatisation spin | ~38.3–38.5°C | 20–40 min | Short reintroduction |
| Real-environment heat ride | ≤38.7°C average; avoid >39.0°C peaks | Selected race-prep rides only | Use for confidence, cooling practice, fueling, and race feel |
| Safety caution | Avoid chasing high readings | Reduce heat load if control fades | Do not use temperature numbers to justify pushing harder |
Outdoor & Indoor Setup
- Outdoor: use warm or hot conditions where available.
- Additional layers can be used if conditions are not hot enough, but should be applied conservatively.
- Indoor: reduce airflow rather than creating uncontrolled heat stress.
- Do not overdress excessively or remove all cooling options.
- Keep fluids available and monitor response closely.
Example On-Bike Sessions
| Session | Protocol | Use Case | Safety Cue |
|---|---|---|---|
| Heat finish | Last 30–45 min of an aerobic ride in warmth or with controlled layering | Adaptation Phase or race preparation | Keep Z2; watch HR drift |
| Controlled trainer heat ride | 45–60 min Z2 with reduced airflow | Precise controlled exposure | Stop if HR spikes or control is lost |
| Outdoor race-feel ride | Final 30–60 min of Z2 in real heat with cooling and fueling drills | Race preparation | Use support, shade stops, sunscreen, and cooling |
| Short re-acclimation spin | 30–40 min Z1–Z2 in mild heat | Refresh readiness | Keep low load |
On-Bike Safeguards
- Do not combine with key high-intensity sessions unless specifically planned.
- Controlled effort is expected; forced effort is not.
- If maintaining power requires pushing beyond aerobic control, reduce load.
- Large or rapid HR spikes may indicate excessive strain.
- Stop or reduce if dizziness, nausea, chills, confusion, or loss of control occurs.
- If in doubt: reduce duration, reduce heat load, and prioritise control.
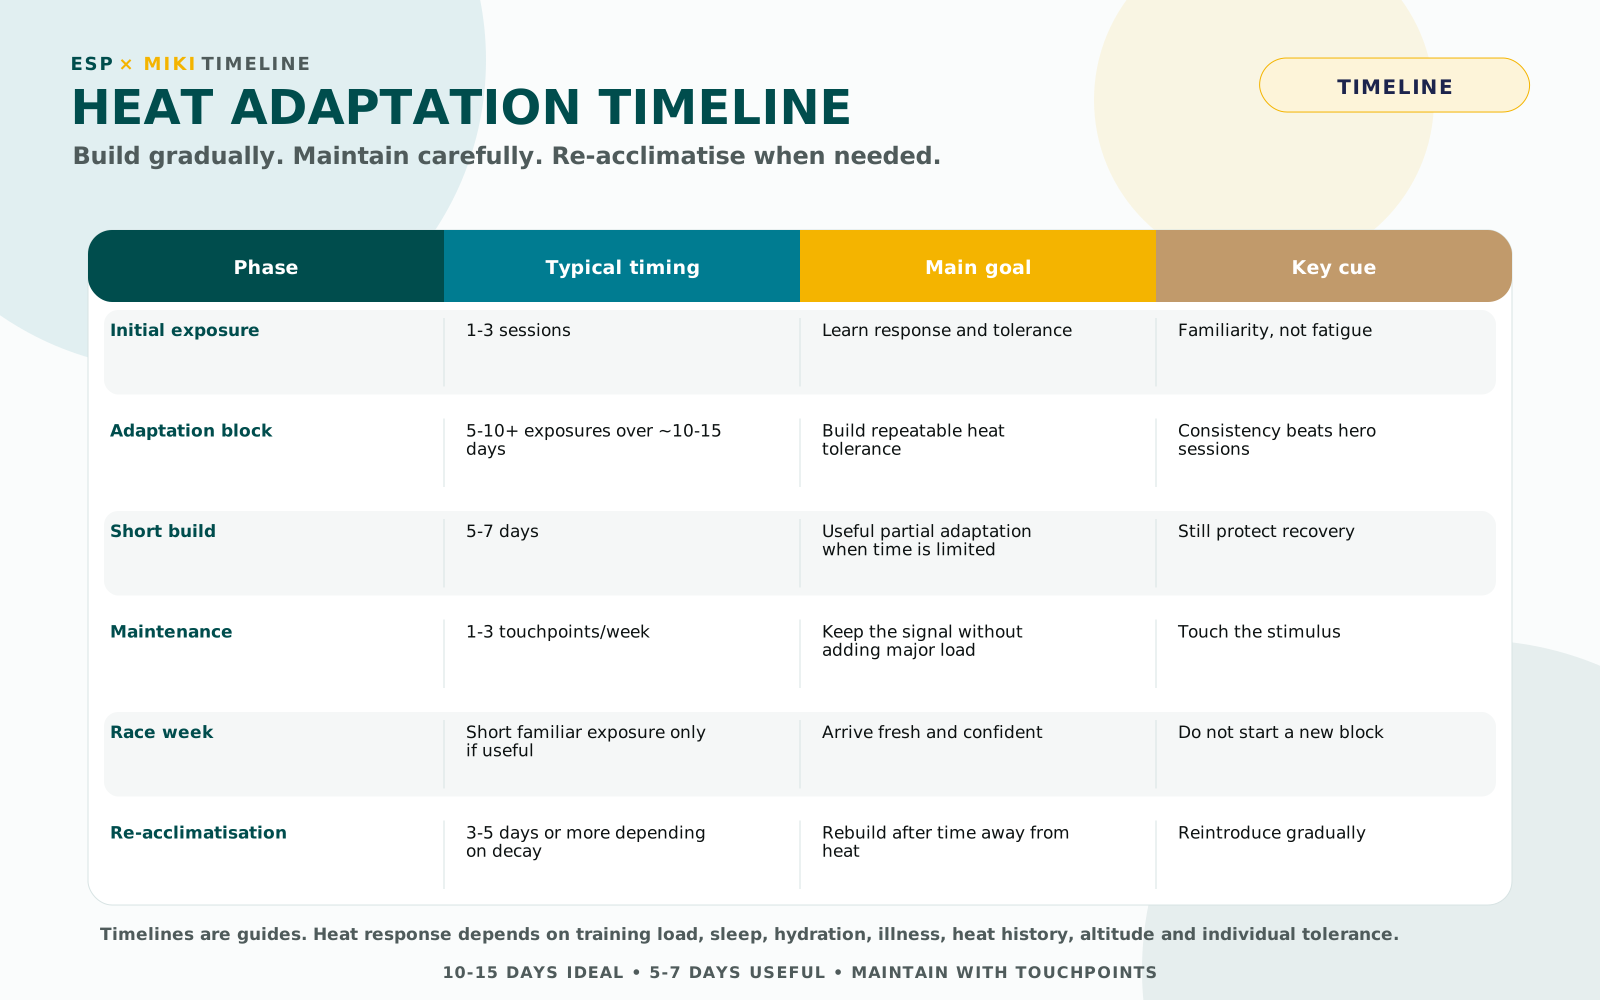
Step 3: Set the Timeline
Heat adaptation is best applied in phases depending on training context, race demands, and athlete response.
These phases can be used individually or repeated across the season. A rider may build, maintain, and then rebuild adaptation several times depending on the calendar.
Phase Summary
| Phase | Purpose | Typical Structure | Method Guidance |
|---|---|---|---|
| Preparation / Initial Exposure | Introduce heat stress gradually and build familiarity | 1–3 sessions/week; short exposure | Passive methods preferred; on-bike heat generally not required |
| Adaptation Phase | Drive primary adaptation and prepare for race heat | 10–15 day block with ~10 exposures | Passive foundation; optional on-bike heat for specificity |
| Maintenance | Retain adaptation without excessive fatigue | 2–3 sessions/week; reduced duration | Passive or active depending on schedule and recovery |
| Re-acclimatisation | Refresh adaptation after decay or before another hot race | 3–5 day reintroduction | Passive first, then active if needed |
Adaptation Phase — Important Cue
The adaptation phase is often described as a 10-day block, but in real coaching it may take closer to 10–15 days.
The goal is usually around 10 heat exposures, but some days may have no heat exposure to protect hard sessions, recovery, or athlete readiness.
Seasonal Application
- Heat adaptation can be used multiple times across a season.
- Use targeted blocks rather than continuous high exposure.
- Build → maintain → rebuild as race demands require.
- Align full blocks with key hot races or important travel.
- Use lower-frequency exposure in preparation or off-season phases for health, routine, and tolerance.
Health & General Benefits
Heat exposure, particularly sauna and other passive methods, can also support general athlete health.
These benefits are separate from race-specific adaptation but remain important within ESP × miki coaching.
- General cardiovascular health
- Muscle relaxation and recovery
- Stress reduction and nervous system regulation
- Mental reset and routine
- Breathing practice and composure under stress
Step 4: Manage Hydration and Recovery
Rehydration is not an optional extra. It is part of the adaptation process.
Incomplete rehydration can reduce recovery, increase illness risk, and limit the plasma volume adaptations that heat training is designed to support.
Hydrate to adapt — not just recover.
How to Measure Fluid Loss
Weigh before and after sessions where practical. Body mass loss primarily reflects fluid loss.
| Measurement | Meaning |
|---|---|
| 1 kg body mass loss | Approximately 1 L fluid loss |
| 2% body mass loss | Meaningful dehydration; monitor closely |
| >3% body mass loss | Excessive for most heat adaptation sessions; adjust strategy |
Rehydration Target
| Step | Guidance |
|---|---|
| Replacement target | Replace ~125–150% of fluid lost |
| Timing | Over the next 2–4 hours |
| Electrolytes | Include electrolytes, especially sodium |
| Example | 1 kg loss → drink ~1.25–1.5 L over 2–4 hours |
Practical Notes
- Begin rehydration immediately after the session.
- Use electrolytes rather than relying only on plain water.
- Electrolytes support fluid retention and effective rehydration.
- Large fluid losses across repeated days indicate heat load, hydration, or session timing needs adjustment.
- For detailed sodium and bottle guidance, refer to the Ride Fueling & Hydration Protocol.
Step 5: Monitor Response
Monitoring should answer one practical question: am I okay to proceed with the next heat exposure?
Most athletes can guide heat sessions using simple signals: heart rate response, sweating, perceived effort, hydration change, and recovery the next day.
Core temperature and thermometers can add useful information, but they should be used as validation tools, not targets to chase.
Can I Proceed?
| Signal | Decision |
|---|---|
| Everything normal | Proceed with planned exposure |
| One signal slightly off | Proceed cautiously or shorten exposure |
| Two or more signals off | Reduce, delay, or skip heat exposure |
| Symptoms or loss of control | Stop and reassess before further heat |
Primary Indicators of Effective Heat Exposure
- Progressive HR drift at constant effort.
- Increased and sustained sweating.
- Rising RPE at the same workload.
- Feeling worked by the heat, but still controlled.
Heart Rate Response
| Signal | Interpretation | Action |
|---|---|---|
| HR rises ~5–10+ bpm at same effort | Typical heat strain | Continue if controlled |
| Large or rapid HR spike | Possible excessive strain | Reduce heat load or stop |
| HR remains elevated after session | Recovery cost may be high | Adjust next exposure |
Recovery Indicators
| Indicator | Monitor | Adjust |
|---|---|---|
| Resting HR | +5–10 bpm above normal | Reduce heat load if persistent |
| HRV | Consistent drop below normal range | Monitor trend and reduce if sustained |
| Sleep | Poor sleep after sessions | Move session earlier or reduce load |
| Fatigue | Accumulating fatigue across days | Reduce frequency or duration |
| Training quality | Key sessions compromised | Move heat away from hard days |
Recovery & Readiness Ranges
| Indicator | Continue | Monitor | Adjust |
|---|---|---|---|
| HRV | Within normal range or ≥90% baseline | Approx. 80–89% baseline | <80% baseline or sustained suppression |
| Resting HR | Within ~±3 bpm baseline | +4–6 bpm | >6 bpm or persistently elevated |
| Fatigue | None to mild | Moderate | Heavy or accumulating |
| Sleep | Normal | 1 disrupted night | 2+ disrupted nights |
Simple Decision Rule
- 1 signal off → monitor.
- 2+ signals off → adjust.
- Single-day changes are normal.
- Trends across multiple days matter more than isolated data points.
Core Temperature Monitoring
Core temperature sensors can help confirm sufficient thermal load, especially in controlled blocks.
However, they are not required for effective adaptation and should not be used to chase extreme numbers.
The ranges in this protocol are thermal-load guidance zones, not performance targets. Use them to validate that the heat stimulus is sufficient and controlled.
- Use core temperature as a validation tool, not the main target.
- Typical adaptation occurs when core temperature is meaningfully elevated.
- Do not chase a specific number at the expense of control, safety, or recovery.
- Stop or reassess if temperature is high and the athlete is losing control.
Using Temperature Tools
Temperature tools can help validate heat load, but they should not override athlete control or recovery signals.
- CORE sensors are the best practical tool for continuous thermal-load monitoring.
- Medical-grade ear thermometers can be useful before and immediately after passive sessions, but values should be treated as trends rather than exact internal temperature.
- Use the same device, same timing, and same method each time.
- Do not chase temperature numbers if symptoms, HR, RPE, breathing, or recovery markers suggest excessive strain.
- For most athlete-led sessions, avoid chasing readings above ~39.0°C.
Medical-Grade Thermometer Use
A medical-grade thermometer can be a useful practical tool when a core sensor is not available.
- Use trends over time rather than single readings.
- Absolute values may vary depending on thermometer type and measurement method.
- Faster return toward baseline over time may suggest improving adaptation.
| Timing | What to Record | Why |
|---|---|---|
| Before sauna / HWI / ride | Baseline temperature | Confirms starting state |
| Immediately after | Post-session elevation | Shows heat load response |
| 10–15 min post | Early recovery trend | Shows how quickly temperature is falling |
| 60 min post when needed | Return toward baseline | Helps flag incomplete cooling or excess load |
Signs of Positive Adaptation
- Lower HR at the same workload in similar heat.
- Reduced HR drift.
- Improved tolerance to heat exposure.
- Faster recovery between sessions.
- Lower RPE in similar conditions.
- Improved ability to stay calm and controlled.
Putting It Together
A good heat adaptation plan links purpose, method, dose, safeguards, monitoring and recovery.
The goal is not to chase the hottest session. The goal is to repeat enough controlled exposure that the athlete becomes more stable and confident in the heat.
- Choose the purpose first: preparation, adaptation, maintenance, re-acclimatisation or race-specific feel.
- Choose the lowest-cost method that fits the goal.
- Progress the dose gradually and avoid forcing heat onto hard training days.
- Protect hydration, sodium, fuel and sleep after every exposure.
- Use readiness signals to decide whether to repeat, reduce or pause heat exposure.
Weekly Integration
This example shows how heat may be integrated across a week. It is not a prescription.
Heat should be placed around training quality, not simply added wherever there is time.
Example Weekly Integration
| Day | Main Training | Heat Add-On | Notes |
|---|---|---|---|
| Mon | Gym + recovery | Sauna 20–30 min or HWI 20–30 min | Good passive/controlled day |
| Tue | Sweet spot / intensity | Avoid added heat unless planned | Protect quality output |
| Wed | Torque / aerobic | Short sauna or HWI if recovered | Top-up exposure if readiness is good |
| Thu | Long ride | Passive heat or controlled hot finish | Key exposure option |
| Fri | Gym / easy | Short passive only | Skip if HRV suppressed or fatigue high |
| Sat | Hill / key session | Avoid added heat | Keep cool and protect output |
| Sun | LSD / aerobic | Optional on-bike heat finish or passive finish | Use only if recovery supports it |
Integration Rules
- Avoid heat before or after key high-intensity sessions unless specifically planned.
- Use passive heat on aerobic or lower-load days.
- Use on-bike heat only when specificity is required.
- If training quality drops, reduce heat first.
- Coach may adapt session timing, duration, and method based on response.
Altitude Integration
Heat and altitude both increase physiological stress. This is where many athletes fail because they stack too much load and underestimate the recovery cost.
Heat can support some overlapping cardiovascular adaptations with altitude, but it is not the same stimulus. Altitude primarily drives oxygen-related adaptation; heat primarily drives plasma volume, thermoregulation, and heat tolerance.
Do not treat heat as a harmless add-on during altitude blocks.
Key Risks
- Excessive cardiovascular strain.
- Dehydration and poor plasma volume support.
- Suppressed HRV and poor sleep.
- Reduced training quality.
- Illness risk from stacked stress.
- Poor iron or energy availability if load is mismanaged.
Staging & Sequence
| Scenario | Guidance | Reason |
|---|---|---|
| Starting altitude camp | Minimise heat in first 5 days | Altitude stress is already high |
| During altitude | Use only very short passive exposure if needed | Maintain familiarity without compounding stress |
| Post-altitude | Allow recovery before full heat block | Avoid stacking return fatigue with heat stress |
| Hot race after altitude | Use 3–5 day re-acclimation bridge if needed | Refresh heat feel without a full block |
| Full heat block | Often best 5–7 days after return from altitude | Lets altitude stress settle first |
During Altitude — If Heat Is Used
- Prefer very short sauna exposure rather than on-bike heat.
- Avoid long on-bike heat rides at altitude.
- Reduce total training load if heat is added.
- Monitor HRV, resting HR, sleep, hydration, and subjective fatigue closely.
Pre-Race Bridge
- Use short re-acclimation exposures 3–5 days before a hot race if needed.
- Prioritise freshness over additional heat load.
- Do not chase a full heat block if the athlete is already carrying altitude fatigue.
- Coach-led planning is critical.
Race Week Considerations
Race week heat exposure should sharpen readiness, not create fatigue. Most adaptation work should be completed before the final days leading into competition.
In race week, use conservative maintenance or short familiar exposure only when it supports confidence and does not compromise freshness.
- Avoid starting a new heat block in the final days before an important race.
- Use short, familiar passive exposure only if the athlete has already adapted and recovers well.
- Avoid long on-bike heat sessions close to competition unless specifically coach-led.
- Prioritise hydration, sodium, sleep and race fueling.
- Shift to the Race Cooling Protocol for race-day cooling strategies.
Relationship to Race Cooling
Heat adaptation and race cooling are related but different protocols.
Heat Adaptation prepares the athlete before hot conditions. Race Cooling manages heat on the day using pre-cooling, ice, cold fluids, shade, clothing choices, pacing and feed-zone strategy.
- Use Heat Adaptation to build tolerance before the event.
- Use Race Cooling to manage thermal load during competition or key hot sessions.
- Do not assume adaptation removes the need for cooling.
- Do not use aggressive cooling strategies for the first time on race day.
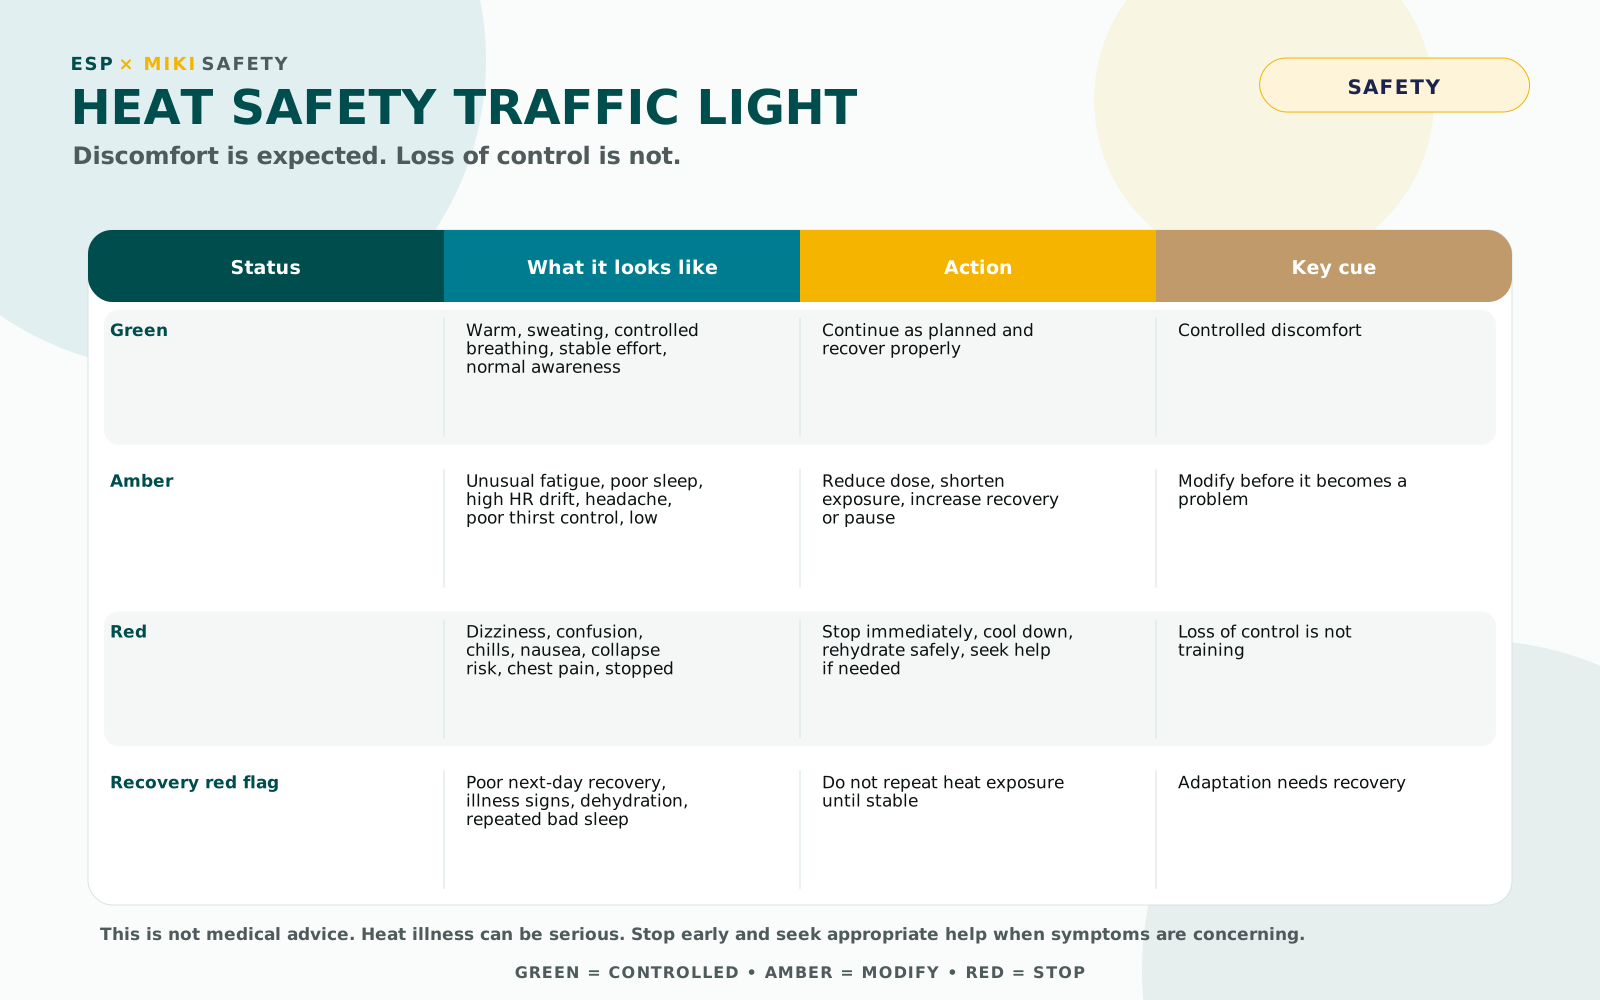
Heat Safety and Red Flags
Heat adaptation works best when the stress is controlled and recovery is protected.
Discomfort is expected. Loss of control is not.
Pre-Session Checklist
| Metric | Target / Cue | Action |
|---|---|---|
| Hydration | Pale urine; avoid starting >1% below normal body mass | Use electrolytes before heat if needed; avoid starting thirsty or depleted |
| Fueling | Carbohydrate available for long or hot rides | Do not significantly delay recovery nutrition when heat follows training |
| Readiness | Resting HR stable and HRV within normal range | If HRV is suppressed or resting HR is elevated, shorten or skip |
| Environment | Safe setup with exit option | Sauna 80–90°C; HWI 38–40°C; fluids and towel ready |
| Monitoring | Core sensor or thermometer if used | Use data as validation, not as a target to chase |
Before Session
- Start well hydrated.
- Avoid beginning heat sessions in a fatigued, depleted, or unwell state.
- Do not combine heat with key high-intensity sessions unless planned.
- Check the environment is safe and controlled.
- Prepare fluids, thermometer, towel, and exit option before starting.
- Build exposure progressively — do not jump straight to full duration early in a block.
During Session
- Discomfort is expected — loss of control is not.
- Heart rate drift is normal — uncontrolled spikes are not.
- Use controlled breathing to stay composed.
- Stop or reduce if dizziness, chills, nausea, confusion, unusual fatigue, or loss of control occurs.
- Do not force duration just to complete the plan.
After Session
- Begin rehydration immediately.
- Use fluids plus electrolytes, especially sodium.
- Do not significantly delay recovery nutrition.
- Allow controlled cooling, but avoid automatically over-cooling every session if adaptation is the goal.
- Monitor sleep, resting HR, HRV, mood, and next-day fatigue.
Post-Ride Heat Integration (Sauna / HWI)
- Small amounts of electrolyte fluid can be consumed during heat exposure.
- Use regular sips rather than large volumes.
- Avoid excessive dehydration, especially after training.
- Recovery nutrition (carbohydrates + protein) should not be significantly delayed.
- Hard sessions → begin fueling before heat exposure.
- Easier sessions → fueling can follow heat exposure.
- For detailed fueling strategy, refer to the Ride Fueling & Hydration Protocol.
Red Flags — Stop and Reassess
- Body mass loss consistently above ~3%.
- Persistent fatigue across multiple days.
- Elevated resting heart rate.
- Suppressed HRV.
- Poor sleep.
- Loss of appetite or motivation.
- Feeling progressively worse across the block.
Female-Specific Modulation
Female athletes may respond differently to heat depending on menstrual cycle phase, hormonal contraception, baseline body temperature, symptoms, and individual physiology.
This section provides guidance only. Individual response should always guide the final decision.
Female-Specific Modulation
| Context | Strategy | Details |
|---|---|---|
| Follicular phase | Often tolerates fuller exposure | Progress normally if recovery markers and symptoms are good |
| Luteal phase | Consider shorter or lower-load exposure | Basal temperature may be higher; reduce duration if heat tolerance is reduced |
| Hormonal contraception | Personalise using response | Use HR, RPE, symptoms, sleep, and recovery rather than day-count alone |
| High symptom days | Reduce or skip | Protect training quality and athlete health |
Practical Notes
- Some athletes tolerate full heat exposure across the cycle.
- Others require shorter sessions or more recovery during higher-temperature or higher-symptom phases.
- Do not force a phase-based rule if the athlete’s actual response says otherwise.
- Use individual patterns over several cycles where possible.
Common Problems and Troubleshooting
Heat adaptation is highly effective when applied correctly, but common mistakes can reduce the benefit or increase risk.
The most common problems come from doing too much, too soon, ignoring recovery, or treating every exposure as a toughness test.
Common Problems
| Problem | Why It Matters | Fix |
|---|---|---|
| Starting too aggressively | Creates excessive fatigue and poor adaptation | Begin with short exposures and build |
| Stacking heat with hard sessions | Compromises training quality and recovery | Separate heat from key intensity unless planned |
| Chasing heat instead of controlling it | Increases risk without improving adaptation | Use enough heat stress, not maximum heat stress |
| Poor hydration | Limits recovery and plasma volume adaptation | Measure fluid loss and rehydrate 125–150% |
| Delaying recovery nutrition | Reduces adaptation quality after hard sessions | Fuel before or immediately after heat depending on session |
| Overusing on-bike heat | Adds large training stress and is harder to control | Use passive heat as foundation |
| Ignoring warning signs | Raises illness and overreaching risk | Reduce or stop when signals accumulate |
| Applying the same plan to every athlete | Individual response varies widely | Adjust duration, frequency, method, and timing |
Individual Response
There is no single correct heat response. Some athletes adapt quickly, while others require a slower progression.
- Training history influences tolerance.
- Body size, sweat rate, sodium loss, and hydration habits matter.
- Heat exposure history changes response.
- Recovery capacity and current training load matter.
- Female physiology and hormonal status can influence heat tolerance.
- Athletes should be adjusted based on response, not forced into one plan.
Signs It Is Not Working
- Sessions feel harder and harder each day.
- Persistent fatigue across multiple days.
- Elevated resting HR.
- Suppressed HRV.
- Poor sleep.
- Reduced training quality.
- Loss of motivation or appetite.
How to Adjust
- Reduce duration.
- Reduce frequency.
- Switch from on-bike to passive heat.
- Move sessions away from hard training days.
- Prioritise hydration and recovery.
- Reintroduce heat more gradually.
Adaptation Testing and Validation
Testing can help confirm adaptation, but it is optional for most athletes.
The goal is to identify whether the athlete is becoming more stable, more comfortable, and better recovered in similar heat conditions.
Baseline & Post-Block Testing
- Baseline test ideally 5–7 days before a main block.
- Post-block test ideally 24–72 hours after the final exposure.
- Keep conditions, equipment, hydration, and workload as consistent as possible.
Field Heat Stress Test
- Indoors or controlled environment around 28–32°C where practical.
- 10 min warm-up.
- 45 min at ~60–65% FTP or steady Z2.
- Record HR, temperature if available, RPE, thermal comfort, and body mass change.
Core Measures
| System | Measure | Tools | Expected Adaptation |
|---|---|---|---|
| Thermoregulation | Temperature rise and thermal comfort | Core sensor or thermometer | Lower rise or improved control in similar conditions |
| Cardiovascular | HR drift | Power + HR | Reduced HR drift at same workload |
| Sweating | Sweat-rate estimate | Scale + fluid tracking | Earlier and more effective sweating |
| Perceptual | RPE and comfort | Athlete log | Lower RPE or better tolerance |
| Hydration | Body mass change | Scale | Better fluid management and recovery |
| Autonomic | Morning HRV / resting HR | HR strap / app | Faster recovery after exposure |
Success Criteria
- Reduced HR drift in similar conditions.
- Lower RPE or improved thermal comfort.
- Improved ability to maintain Z2 without forcing.
- Faster recovery after sessions.
- Stable or improved HRV across the block.
- Better hydration control and lower excessive body mass loss.
Science and Adaptations
Heat adaptation drives a range of physiological and perceptual changes that improve performance under thermal stress.
Most meaningful adaptation occurs within 5–10 exposures, with a focused block often completed across 10–15 days to allow for key training days and recovery.
Adaptations begin to decline within 5–7 days without heat exposure, although different adaptations decay at different rates. Maintenance usually requires 2–3 sessions per week, and reduced duration is often sufficient once adaptation is established.
Adaptation & Performance Benefit
| Adaptation | Mechanism | Performance Benefit |
|---|---|---|
| Plasma volume expansion | Increased plasma and total blood volume | Lower heart rate at a given workload; improved cardiac output |
| Thermoregulatory efficiency | Earlier sweating and improved sweating response | Better cooling and reduced thermal strain |
| Cardiovascular stability | Reduced cardiovascular drift under heat stress | More stable effort and improved durability |
| Core temperature tolerance | Improved tolerance to elevated internal temperature | Delayed fatigue in hot conditions |
| Cellular stress response | Heat shock protein and oxidative stress adaptations | Improved resilience under physiological stress |
| Perceptual tolerance | Habituation to heat sensations and discomfort | Better pacing, comfort, and decision-making in the heat |
| Cross-adaptation | Shared cardiovascular stress with endurance and altitude stimuli | Potential support for aerobic stability when dosed correctly |
Adaptation Timeline
| Timeline | Typical Response | Coaching Note |
|---|---|---|
| Initial adaptation | 5–7 exposures | Most athletes begin to feel more controlled |
| Adaptation Phase | 7–10 exposures | Primary physiological adaptation window |
| Block duration | 10–15 days | Allows ~10 heat exposures while protecting hard training sessions |
| Maintenance | 2–3 sessions/week | Reduced duration can maintain benefits once established |
| Decay | Begins within 5–7 days without exposure | Keep touching the stimulus before hot races |
Optional CORE-Guided Adaptation Ranges
When a CORE sensor or similar tool is available, temperature data can help validate that the athlete is receiving enough heat stress.
These ranges are coach-guided validation ranges, not numbers athletes should chase.
| Context | Typical Validation Range | Coaching Note |
|---|---|---|
| Preparation / Initial Exposure | Approx. 38.4–38.6°C | Controlled exposure and familiarisation |
| Adaptation Phase | Approx. 38.6–38.9°C | Only when tolerated and recovery remains stable |
| Maintenance | Approx. 38.4–38.6°C | Lower-load exposure is usually sufficient |
| Re-acclimatisation | Approx. 38.3–38.5°C | Short reintroduction; do not overload |
| Upper safety caution | Avoid sustained high readings or loss of control | Stop or reduce if symptoms appear |
Adaptation Retention & Re-acclimatisation Detail
| Adaptation | Approx. 7-Day Loss | Approx. 14-Day Loss | Practical Meaning |
|---|---|---|---|
| Plasma volume | ~3–5% | ~6–10% | Can decline quickly; maintenance matters |
| Sweat rate / sensitivity | ~10% | ~20–25% | Cooling response may fade with time away from heat |
| Perceptual tolerance | Slight | Moderate | Usually retained longer than plasma changes |
| Cellular stress response | Minimal | ~20% reduction | Periodic mini-blocks may help reinforce adaptation |
| Performance effect | Often small | ~1–2% possible | Depends on race heat, athlete and exposure history |
Re-acclimatisation & Maintenance Detail
| Component | Typical Recovery with Re-exposure | Maintenance Requirement |
|---|---|---|
| Plasma volume | 2–3 sessions | 1–2 sessions/week |
| Sweat / thermoeffectors | 4–5 sessions | 1–2 sessions/week |
| Perceptual tolerance | 1–2 sessions | 1 session/week |
| Cellular stress response | 5–7 days exposure | Mini-block every 4–6 weeks where appropriate |
| Performance readiness | 3–5 exposures | Reinforce pre-race if needed |
Deeper Insight — What Decays First
| Adaptation | Typical Loss Pattern | Practical Meaning |
|---|---|---|
| Plasma volume | Declines relatively quickly | Athletes may feel heat strain return within days |
| Sweat response | Often retained slightly longer | Cooling may remain improved even as cardiovascular strain rises |
| Perceptual tolerance | Often lasts longest | Mental familiarity may remain even if physiology starts to fade |
| Cellular stress response | Maintained by periodic exposure | Mini-blocks can reinforce adaptation across the season |
Applied Field Notes
This section captures applied field practice from high-performance endurance environments.
Use these as coaching examples, not rigid templates. Public-facing versions may choose to generalise team names and exact claims.
Field Best Practice Examples
| Example | Methodology | Integration Pattern | Key Learning |
|---|---|---|---|
| WorldTour / Tour preparation | Post-ride sauna 20–30 min across a focused block with monitoring | After aerobic rides; avoid heat before intervals | Dose heat around recovery and readiness |
| Hot-stage race preparation | Trainer heat rides plus passive heat before travel | CORE / HR / HRV feedback where available | Specificity improves comfort and power stability in heat |
| Triathlon / Ironman squads | Sauna plus trainer heat 2–3×/week during preparation, then outdoor heat closer to race | Shift toward real-environment exposure in the final 10–14 days | Fueling, cooling and hydration drills matter |
| Altitude plus heat environments | Short passive exposure during altitude; fuller heat block after camp | Avoid stacking full heat load with early altitude stress | Sequencing protects recovery and adaptation |
| Female endurance athletes | Shorter or more flexible dosing when symptoms or higher basal temperature reduce tolerance | Personalise through HR, HRV, symptoms and feedback | Individual response matters more than a rigid cycle rule |
Applied Principles
- Avoid heat immediately before key intensity.
- Use passive heat to add heat stress with lower mechanical load.
- Use on-bike heat for confidence, cooling practice and race feel.
- Use recovery signals to adjust dose.
- Fueling and hydration drills should be included before hot races.
Heat Adaptation Glossary
Heat Adaptation Glossary Table
| Term | Meaning |
|---|---|
| Z2 | Aerobic endurance intensity — steady, controlled effort |
| HR drift | Gradual rise in heart rate at constant effort |
| RPE | Rating of perceived exertion — how hard the effort feels |
| Core temperature | Internal body temperature |
| Heat stress | Combined physiological load from temperature, humidity, clothing, and exercise |
| Passive heat | Heat exposure without exercise, such as sauna or hot water immersion |
| Active heat | Heat exposure during exercise, such as riding in hot conditions |
| HWI | Hot Water Immersion — bath, spa, or hot pool exposure |
| HRV | Heart Rate Variability — a recovery and nervous system trend marker |
| Resting HR | Heart rate measured at rest, usually in the morning |
| Electrolytes | Minerals, especially sodium, that support fluid balance and hydration |
| Plasma volume | The fluid component of blood; increased plasma volume supports cardiovascular stability |
| Thermoregulation | The body’s ability to regulate temperature |
| Re-acclimatisation | Short reintroduction of heat after adaptation has partly declined |
| Nasal breathing | Breathing through the nose; useful for control when tolerated |
| Controlled breathing | Deliberate breathing rhythm used to maintain composure under stress |
References
This protocol is based on current endurance coaching practice, heat acclimation research, sauna and hot water immersion literature, athlete monitoring principles, and ESP × miki field application.
Full formatted references can be added in the final published version if desired.
- Périard JD et al. Heat acclimation and endurance performance literature.
- Garrett AT et al. Heat acclimation and time-trial performance literature.
- Scoon GS et al. Sauna bathing after training and endurance adaptations.
- Neal RA et al. Heat acclimation and endurance training adaptations.
- Tyler CJ et al. Heat acclimation review literature.
- Patterson MJ et al. Heat acclimation and thermoregulation literature.
- Zurawlew MJ et al. Hot water immersion and heat adaptation literature.
- Female athlete heat tolerance and menstrual cycle / hormonal modulation literature.
- CORE Sensor / GreenTEG core temperature monitoring guidance.